Showing posts with label Kitchen Remodel. Show all posts

6.25.2012

Good for what ails ya

I'm not sure if that title really describes this post but it keeps popping in my head so I'll stick with it. First off, thanks for your comments about the kitchen, it is great to look back and see the progress me made but even better to realize that we no longer have to feel any stress over what needs to be done.

One question I've seen on several DIY blogs and have encountered once or twice myself is "How can your marriage handle all that renovation?" or it's statement variation "Oh, I'd love to renovate/buy a fixer upper/do more projects but I think my husband and I would kill each other before we finished." Sometimes it seems like people say that to make themselves feel better about not doing things which is odd, it's not like I'm judging someone because they haven't done a bunch of projects. But I do understand the idea behind the thought because I worried a little bit about that before we started too, not so much that my marriage would suffer but that the reno would take too much family time. Now that we have finished our first big projects, I see things different for several reasons.

1) Making our home
Now most of what Craig and I spend our time on could be considered making "a home." I'm a stay-at-home mom and "homemaker" so I spend my days with Lucy taking care of her and our home. And while Craig isn't at home, he is out in the world providing us with the money we need to pay for our home and the things we need to fill it like food and clothing and decorating supplies :-). But there is something much more real about physically transforming your space into the house and home you want it to be, that fits your family's needs. The more we work on the house the more it feels like it belongs to us, like it is our home and place of refuge from the world. And I'm not just talking about big expensive projects either, our garden hasn't been that expensive but probably has done the most to foster the "home feeling" in me.

2) Partners in crime
We also have our own spheres when it comes to our roles in the home. They are flexible - like when I'm at the beginning of a pregnancy and Craig takes over everything or he is gone and I have to take the garbage out or put gas in the car (yuck!) but basically, we have our jobs and we do them. But when we take on a projects, we collaborate a lot more. We still have things we know we are better at - I know better than to let my clumsy self go anywhere near a saw and Craig knows that the final say in design decisions should probably rest with me, but we go over ideas and make decisions as a team and that's nice.


3) The "romance" of working side-by-side.
We haven't had a lot of date nights since Lucy was born, at least not traditional date nights. But we've spent many evenings working together, talking with each other and just being. And it may not seem as romantic as a fancy dinner or night at the symphony, but I don't think I would probably remember those 10 years from now but I'm pretty sure I'll remember the evening we spent tearing down our walls or the one where we accidentally nicked our pipe and water went everywhere (its funnier now than it was at the time :-) and the one we spent painting until my eyes hurt from all the yellow. And at the end of a long night of working on the kitchen, we are both desperate to get into bed and isn't that the sign of a good date night?

4) Say you're sorry. 
If you aren't as good at saying you're sorry as you'd like to be, well, you'll get lots of practice when you take on a big project. Because when it is midnight and you are completely overwhelmed and out of energy but know you have at least an hour until you reach a stopping point, you will snap at your spouse. And yes, he'll know that you aren't really mad at him for handing him a pencil without an eraser, putting ice in your water bottle or using a grammatically incorrect phrase three times in a row but it's still good to say you're sorry so that he knows you know you aren't really mad about those things either. And then will come the big mistakes, like when one of you puts a gash in the beloved floor or loses that one teeny tiny screw that is so important the house will fall apart without it, and your sorry-saying skills will suddenly come in really handy - as will the other's forgiving skills.

5) Reasons to relish your spouse
This is the gift that keeps on giving. Craig works hard all the time but it is sadly much too easy for me to forget that, or at least forget to appreciate him the way I should. But every time I mop our floors, I think about how much time and effort Craig has spent on our floors. He has sanded and installed and stained and polyurethaned his heart out for those things and I love them, not just because they are gorgeous and easy to clean, but because I see them as a sign of his love for me. He likes the floors too but if it was up to him, he probably would have just left the carpet back at the beginning.

So I'm not saying that you should go out and start renovating your house to save your marriage. And if you or your spouse really hates working on house projects, you might want to find another "fun activity" to do together. But if you like DIY stuff, don't be afraid of it. Just look at those late nights and "this will be funny later but right now I'm about to explode" moments as marriage builders.

5.31.2012

One last push!

This past weekend we finally got around to the last big kitchen project and I know what your thinking - finally! We've actually had the supplies in the basement for a few months now but the time restraints of tiling made us think it needed to be done in the evenings and evenings during the first 50% of my pregnancy are not my shining hour. 

What were the supplies? These gorgeous glass subway tiles. I wavered quite a bit initially. Everything else in the kitchen is so classic that while I thought a white subway tile would probably have longer staying/selling power, I also thought it would be a tad boring. And this is my dream kitchen people, I've worked hard for it so why not go with what I really want. Which brings us to teal - but mosaic or tile. Again, I pinned and pinned and searched and decided that a 3"x6" subway tiles would be perfect. But ordering "teal" on the internet is a bit tricky - teal can mean a lot of things to different people. So I order a "teal" sample from wholesalersusainc.com (which was recommended on several diy sites I visited) and several lush tiles from modwalls.com with cool names like "surf", "wasabi,""sea grass" and "pool."


The verdict - plain old teal (which I believe is the 5th from the left in the above picture), how anti-climactic! But luckily for us, it was the cheapest option (I didn't tell Craig which was which when we selected a color so he couldn't bias himself towards the cheap one :-)  Now onto the actual installation.

Since this whole thing has taken us about 9 months, it only seems fitting to throw in a birth analogy. This project was a bit like crowning - we really wanted to be done with the whole kitchen project and just enjoy our new room, but we had to muster up the energy for that final push :-) But Craig had Friday and Monday off and I knew my increasingly large stomach was only making time our enemy, so we got it done!

Friday was a bit rough. Not really because of the tiling itself, we just had one of those nights. Lucy was cranky and fought sleep (getting up every 30 minutes until I finally figured out her teeth were bothering her (because she bit my arm in her typical non-vindictive manner) and gave her some Tylenol. Then Craig and I had a bit of a miscommunication which lead to him coming home with the right wet saw but the wrong blade (glass tiles need a special diamond blade or they will chip). So back he went for the right blade. But when he got home again, he realized that Home Depot hadn't given him the wrench he needed to change the blade so back again. But finally, around 10:30 we started mixing up our mortar and finally getting some tiles on the wall. Craig was out in the garage cutting tiles while I placed them and marked new ones for him to cut. 


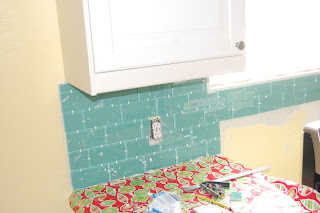
The first section is done! Because of the cuts, this ended up being the hardest section and it took a while so I was really worried it was going to take us 10 hours to tile, but things sped up from there. 


By the corner, it was about 1 am and we were both getting pretty tired. It was at this point that I was so glad I bought two bags of mortar. Each 10lb bag was supposed to cover 16-20 sq ft with our type of tile/spacers and we estimated our surface area to be 19 sq ft but I went ahead and bought two bags thinking I would hate to get 2 feet from the end and run out and they were only $20 so it wasn't a huge loss if we didn't need it. But what ended up happening was we got halfway done and I knew I couldn't keep going - but since we had that second back to start fresh with in the morning, I didn't have to!


First night's progress! (And yes, that is wrapping paper on the countertop. We looked at Walmart and Home Depot for a big roll of brown paper with no luck so we used what we had. 

Not so early the next morning, we set Lucy up in the living room with her new Winnie-the-Pooh movie and started up again. We had a slight technical difficulty here too because about 1 minute into the first morter stir (which is supposed to be 10 minutes), our drill died and we couldn't even find the charger. So I stirred it by hand with a random piece of wood we had while Craig ran up the hill to borrow one from Neighbor J's husband. It was really stressful for a few minutes but it turned out all right. And just a little over two hours later, we put the last tile into place. 

Then we had a nice 48 hours break while mortar set. Sunday night we took out all the little white spacers and cleaned out the little bit of morter that had come through. I had actually done a pretty good job keeping the mortar out of the spacers - except for the corner that we finished at 1am. I wonder why I got a bit lazy there :-) Then we could get a good idea of what the final result would look like. 


Late Monday morning, we got to grouting. We used StarGlass urethane grout, the brand recommended by both of the companies I ordered samples from. Modwalls had lots of color options but it was hard to tell the difference online and I began to hyperventilate with all the choices so when I saw that wholesalersUSA only had the diamond color, I went with that and called it a day.

Grouting was actually fairly easy, although my arms were cramping by the end. Craig followed behind me and cleaned up. We had gone ahead and gotten the grout haze remover which I would recommend. Water should get it all off in theory but it was nice having the heavier duty stuff for reassurance.


And there it is after grouting. You can't see much of a difference in the pictures, but in real life you can. The grout really made the tile pop. Of course, that also meant it made all our mistakes pop too but for our first tiling job, I think we did pretty good. The main problem is after tiling and grouting and cleaning up all the haze, you've just spent hours staring at the tile from about 6 inches away so you know exactly where every tiny mistake is. But in reality, nobody is going to look that closely at our tile ever again - and the worse spot is behind our toaster oven :-)

For anyone contemplating a glass tile backsplash, here are a few things I learned:

- Do it! It really isn't that hard and looks awesome.

- Just don't do it while you're pregnant. Leaning over a counter and placing tiles is hard on your back to begin with, but when your center of gravity is already messed up, it's not a good idea. And if you do it anyway, make sure you schedule your chiropractic appointment for the week after the project, not the week before, or at least stock up on Tylenol.

- Knock down the mortar grooves. I read different things on whether you should or should not flatten the grooves/notches after making them but I went ahead and did it. The fear of not doing it is seeing shades through the glass (this isn't an issue with regular ceramic tile). I think the fear of doing it is that your hold isn't as good but I didn't have an issue with that.

- Keep a credit card handy. (Or if you are a no-credit family, use a grocery store card :-) The trowels that you buy are huge so if you have any tiny areas to cover (like the one-tile tall area between our sink and window or tight corners), it won't be much use. I used the credit card to guesstimate the thickness.

- Keep the grout lines clean of mortar. It seems like a pain to worry about that when you feel like you are under pressure to get the tiles up before it sets, but it is sooo much easier to get the wet mortar out than to have to go back and clean it up later. Trust me.

- Do it! Okay, I said this already but even with all our random troubles, it was a pretty easy project. I'm not eager to jump right into another tiling project, but I won't rule it out for our future either (unlike drywall, which I would rather sit through 2 days of constant Snuggle Puppy singing than ever have to do again).

And the end result? Overall, I love it! Of all the design decisions I made, this one was the one I was most worried about but the tile did just what I was hoping it would. It took a nice but boring kitchen and gave it some personality and added just a touch of the vintage look back in.

Wait, you want to see to see the whole finished kitchen now? Too bad! You'll have to wait and come back  tomorrow!

4.17.2012

Islands in the Stream

We have a kitchen update for you - I bet you thought those were done. This weekend we installed the counter top on our island. But first, we realized that we did not discuss the island installation process, and thought that we should cover that.

Our island is constructed of two base cabinets screwed together; one cabinet is 24" wide, and the other is 15". The base cabinets we use come with legs, which are adjustable to account for uneven floors. They also bring the cabinets up to normal height. But in order to secure the island, we would have had to either forgo the legs, which would leave the island a few inches shorter than usual, or we had to put something underneath the cabinets to attach them to. We opted for the latter, and I made this:


It consists, as I recall, of a stack of three boards; 2 2x4s and a 1x4. I screwed the bottom board to the floor, then screwed the 2nd board to the first one, and the 3rd to the second. I added the short pieces in between as braces. I placed the island on top of this, and screwed through the bottom of the cabinets into the wood.


Here is the island after I installed the toe kick boards. Now on to the counter top.

We selected the Ikea Numerar oak counter top in size 73" x 39". The width allowed for about 14" overhang, so we can have a two-person seating area at the island. But we had to cut the counter down to a length of 41". Using advice from the Ikeafans website, I bought a new 40-tooth carbide-tipped blade for my circular saw and went to work. I made a practice cut at the end of the counter before making my real cut (of course, the first cut was better). The saw cut through the counter quite easily - I was surprised. I sanded down the edges of the cut, then brought the counter inside to acclimate to the indoor temp and humidity for two days before installing it. Here it is attached to the island:


After three coats of mineral oil and some light sanding, this counter will be ready to use today. The leftover melamine board we had been using as a temporary counter top for 3 months has been converted into a closet shelf.

Update: the mineral oil by itself was drying out pretty quickly, so we bought this butcher block conditioner. It contains mineral oil, beeswax, and carnauba wax. It seems to be doing the trick, but MacKenzie is still on the lookout for something not petroleum based (even though Craig says this stuff is just fine).


1.18.2012

Countertop Choices

As a boy, I would listen to Minnesota Twins baseball games on the radio. One of the advertisers on the games was Cambria, manufacturer of quartz countertops. For some reason, these ads made an impression on me, even though I was not in any way in the market for countertops, since I was a kid and had no need for them.

Fast forward to 15 or so years later, I was in the market for countertops, and sure enough, Cambria came to mind (talk about a delayed payoff on Cambria's investment in advertising). But I'm glad it did come to mind. Quartz has a number of advantages as a counter surface:
  • Stronger than granite
  • Nonporous, so it doesn't need to be sealed and doesn't harbor bacteria
  • Won't scratch or stain
  • Cambria  is mined and manufactured in the US
  • Kosher-certified (if that's your thing)
  • Wide variety of colors (we chose Sharpham)
  • Easy to clean
Here's a shot of our counter:


UPDATE: Free gift! A cheeseboard.


1.14.2012

In the Hood

Since I am a big proponent of ventilation*, I made sure our kitchen remodel included a outdoor-vented range hood above the stove, not a wimpy microwave-over-the-stove air recirculator. We selected the first model on this page. We ordered this fairly early in the remodel process, but then just let it sit in the box until it was time to hang it up. But we should have opened the box up earlier.

Since our ceiling isn't that tall (8 feet, or a couple of inches below that), and these fans have some placement requirements, it was a rather tight fit. First, these hoods are supposed to be placed at least 30" above a gas stove (24" above an electric one). On top of that, one needs to make room for the duct cover (the top part). For us, I had to cheat by an inch or so on the 30" requirement, and at the end I had to trim 1/2" or so off the duct cover to make it fit under the ceiling (I thought I would have to take the piece somewhere to get it cut, but then realized I could just use tin snips).

Furthermore, the owner's manual states that you should install horizontal 2" x 4" supports in the wall between the two studs on either side of where the hood will go. The hood is to be screwed onto these supports. Had I read this before the drywall guys came, I could have put those in, but I wasn't about to cut open the drywall after the fact. So we had to improvise a bit. The hood is held up by four screws; we used the heaviest-duty drywall anchors we could find for the top two screws. The bottom two screw holes lined up with our window, so we could not use those without finding a workaround.


What we did was attach two 6" long flat metal pieces with small holes in them (I forget what the item's real purpose was) to the horizontal window frame 2" x 4" above the window. The two pieces hung down, and we screwed through the bottom two hood holes into these pieces. We figure this gives the hood some decent support. Also, the duct cover is attached to the wall with a bracket where it meets the ceiling.

To cut a hole in the ceiling for the duct I just used a drywall saw. That part was pretty easy. When you are connecting the duct sections, I guess you're supposed to use aluminum duct tape, not the regular duct tape we all know and love. The guy at Lowe's told me I should use screws, which makes sense. Screws are a no-no in dryer vent ducts, because they catch lint, which can burn, but there will be no lint in my range hood ducts.

This is the kind of job that takes a couple of extra pairs of hands, so grab some friends if you are doing this project. I have yet to cut through the wall of my house to vent the hood to the outside. I hope that part goes well. I couldn't find any 8" vent caps, so I had to buy a 8" to 6" reducer and a 6" cap.

*This was my third ventilation project in this house. The first two were: 1) convert the dryer vent from an indoor one (yeah, who knew?) to and outdoor one, and 2) install a outdoor-vented fan in the bathroom.

1.11.2012

Let there be light

Light fixtures: A sign we are near the end of remodeling saga. It also means we are nearing the end of our budget. So what's a girl to do? Improvise.

This is what we started with. A horrible outdated brass chandelier. A cheap ceiling fan (with pieces of the wall border cut out and pasted onto it so it matched) and a fluorescent tube partially hidden in a cabinet. None of it was staying.


I had very specific ideas of what type of lighting I wanted - simple school house style retro pendants and chandelier. These were my inspiration pieces.

This chandelier for over the dining room.

A simple flush mount pendant for the main kitchen light.


And a pendant for over the sink (but in the same oil rubbed bronze as the above two, minus the blue strip on the shade)

But if you add up the cost of those fixtures and shades, the total comes to a whopping $766.30!

Originally, I budgeted $500 for lighting but that $766.30 doesn't even include undercabinet lighting which we estimated would be about $180 so I really needed to make some changes and be creative if I wanted my vision to work. It took three trips to make what I wanted happen. First up, our local thrift store. I had seen lots of "vintage" (read - really old fashioned) style light shades and fixtures there before and they did not let me down. I had to search through a lot of really bad shades but I found a pack of 4 milk white 2.25 fitter shades in just the style I wanted - for $1!

Then Habitat Restore. Again, it took some digging and squinting before I picked up a chandelier and a pendant. The chandelier was ugly brass and had horrible shades, in other words, not that different from the original, except this one had potential. The pendant was the perfect color. It was a tad long and we were trying to figure out how to cut it shorter when we realized it was in sections so we just removed the middle rod to get it to a perfect length. Add in a new glass shade that I also found there and we are getting close to finished. Total: $35.

The last stop was good old Home Depot. They have basic pendant fixtures and one or two styles of schoolhouse shades so I grabbed another milk white shade to match the four I got at goodwill, a white plastic flush mount kit and a shade to fit, plus two cans of spray paint, chrome and oil-rubbed bronze (originally, I was not sure which finish I wanted for the kitchen fixtures). Total: $28

Grand total: $64. Of course, I wasn't quite done yet. And if I was a good blogger, I would have lots of wonderful process pictures with all my supplies laid out but I don't. But basically, I took this chandelier

(picture is mid spray paint but the painted side is away from the camera so this is really what it looked like when I got it)

and some supplies like this, give or take a few :-)
 and did some of this (ignore chrome color, I tried both and liked oil rubbed bronze best so I redid the chrome one)
 and this

To get this.

and this


and all together, this: 


Nope, I'll never be a professional blogger. But at least I have nice kitchen lighting. I'm happy and so is the budget!

Update: We ended up using a coupon to buy under-cabinet lighting so all the lighting combined was $224. I came in over 50% under budget! But I also just selected a kitchen backsplash tile and will be taking all that savings and putting it directly towards that. Oh well, you win some, you lose some :-)

1.09.2012

Week 16 Update.

We're still chugging away. We took a big break for Christmas when we went up to ND to visit the family but have been catching up.

I don't have any pictures of either of things for you because neither of our two cameras are cooperating right now but the kitchen doesn't look that much different.

The electrician's been back so now we have working outlets and new fixtures (more on those later this week). Once he finished up with the stove, we were able to install the last wall cabinet so we only have the island left but we are waiting for those until the plumber installs the dishwasher so he can actually have room to manuever it.

Craig's spent this week installing all the trim, toe kicks and cabinet hardware. I don't think it would show up as a big change on a photograph but those little things really make a difference in how finished it all looks. I've been debating backsplashes and ordering samples. I'm not sure which of us has been sweating more. The backsplash decision has been stressing me out but I think I'm close to deciding - how's that for committing!

The biggest change we have left is the countertops which are scheduled to arrive Thursday morning! I'm so excited. Then Friday the plumber comes at which time our kitchen will be functional again. Technically we aren't supposed to use it until we have the inspector back but just knowing it is working will be something. Here is a rundown of what still remains.
  • Countertops and undermount sink installed
  • Plumber finishes up sink and faucet installation, installs dishwasher and hooks up water to fridge
  • We install island foundation, island, and island toe kick.
  • Electrician comes back (last time!) to put outlet in island.
  • Inspection time!
  • Backsplash samples finish arriving and MacKenzie commits to one. 
  • Craig takes last trip to Ikea to pick up butcherblock (was out of stock during last trip) and pick up a few items (extra glass shelves, drawer that was out of stock, etc). 
  • Butcherblock countertop installed on island
  • Backsplash installed.
  • The fun stuff - art, curtains, putting everything in its new home.

11.23.2011

Garbage Disposal

Our kitchen demolition project was clearly going to generate a lot of waste, so we looked around for a way to get rid of it. A dumpster was the obvious option. The problem with them, though, was that you only get them for a week or so before the garbage company comes to take it back. Since our project is largely do-it-yourself, it has proceeded more slowly than a professional job, so a week wasn't going to cut it. We could have piled our debris in the yard, ordered the dumpster, and loaded it after demolition was complete, but that would have been a pain.

MacKenzie, however, had heard of this product called The Bagster. It is a 8' x 4' canvas-like bag that you buy at your favorite home improvement store for $30. You fill it up at your leisure, and schedule your pickup when you are ready, paying for collection when you book it. These bags hold 3 cubic yards, as compared to about 10 or more for a dumpster. Costwise, it was about the same for us to get two of these as it would have been to get a dumpster. Two bags was enough to hold all our debris, and we kept the bags for a good 7 weeks before having them picked up (you get a bit of a discount if you have multiple bags picked up at once). So this is an option you might consider for your disposal needs.

One note I will add is that, when you view promotional videos for The Bagster, they make the sides look so rigid. That was not our experience.


Maybe I did it wrong? This wasn't a major issue, but I thought it was kind of funny.

Update: The bag comes with specific placement directions (5 feet from any building, 16 feet of overhead clearance, 10-foot wide driveway, etc.). I was worried about getting these picked up, because our driveway is L-shaped and hard to get in and out of for larger vehicles. But Waste Management had no trouble taking our full Bagsters away.

11.21.2011

Week 9 update (or hip hip hooray, the floors are done!)

Lucy and I went home last week, just for a few days, (we are back with my mom now)  but it was a fun treat to see the progress on the kitchen. I left right before the drywall was put in and the only pictures I've seen are the ones you all have so it looked a lot different when I walked inside. Craig had just finished installing the floors. They look great. Even Lucy was impressed. She kept pointing to the floor and signing daddy. When I say that yes, daddy did the floors, she signs "me" - yep, she thinks daddy did the new floors just for her. And I guess that is partially true.

Since Craig stained the existing hardwood floors in the rest of the house himself, we knew exactly what stain to use so (crossing our fingers) we should expect a nice match as long as we started with the same material. We weren't exactly sure whether the old stuff was red or white oak but from my research, it seemed like red oak was the more likely candidate so we went with that.

It was actually harder than anticipated to find unfinished wood flooring but Lumber Liquidators had just what we wanted. They have three grades of red oak: select, natural and rustic. We went with natural, which had a quite a bit of variation, similar to our old flooring and our favorite style-wise (a happy coincidence) but not the level of knots and open spots that the rustic would have.

Last Sunday he stained the floors and the color is perfect! Then he spent the next two days laying down the three coats of poly. We were a bit worried about that because the first time we went with Varathane oil-based satin finish but both Lowe's and Home Depot were out of that so we went with Varathane High Traffic Satin oil finish hoping there wouldn't be a visible difference. This morning the second coat was dry to the touch but glossier than the old area and I was a bit worried but by 18 hours of dry time the sheens were almost identical so it looks like we lucked out with that too  (I could see a slight different when I put my head down on the ground and the sun was shining directly on the seam but I'm not really worried about people doing that and there will be cabinets covering about half the seam). In fact, I'm actually happier knowing we have the heavier duty poly in the kitchen since even with only three of us, the kitchen will certainly be a high traffic area. (Here's a post he did on floor staining back in January.)

Here they are in all their glory: We can finally take a progress shot from the same angle now that the drop cloth wall we had up has been taken down.


And here is it today!


After letting them sit a few days to make sure they were fully dry, we were able to paint. And you might notice that we also have a a few new shiny appliances now.  We're already been enjoying the new fridge for a few days and the dishwasher (off-camera to the right) is making a nice makeshift table for the time being. The stove was delivered Saturday and next week the plumber is coming to install the propane line.

I really feel like we're on the downward slope of our project now that the floors are done. The window and the floors were the two biggest question marks in our planning and neither of us had any experience installing windows or floors but now that they are done, the room looks like a room again and I can actually visualize my kitchen. I'm excited! I'll be even more excited when I finish de-dusting my house*  but still, I'm excited!

*Even with the drop cloth wall, the dust got everywhere. Lucy and I have spent the last two days dusting, sweeping and wiping down walls. The amount we get each time we sweep up is diminishing so another day or two of cleaning and we should be back to normal.

11.19.2011

Hardwood Floor Installation

MacKenzie has another floor post planned, but first I thought I'd talk a little about the installation process. I installed 3/4" x 2 1/4" tongue-and-groove unfinished red oak flooring.

Our existing subfloor is 1" x 8" planks. Before starting the install, I replaced a couple of decaying boards and then made sure all the nails were pounded in all the way. Then I laid down 15-lb felt paper. I found different answers online about whether to overlap adjacent pieces and whether or not to staple it down, but I overlapped by 3-4" and stapled.


I had the issue of how to transition from the existing wood to the new wood. Ideally, you would interlace the boards, so adjacent boards don't end right next to each other, but that wasn't an option without tearing out boards. So I did as Lumber Liquidators suggested and put one row of flooring perpendicular to the existing floor to serve as a transition strip (visible in photo above). I installed the strip with the tongue facing the new flooring, which was really the only option. Before installing the strip, I had to take a circular saw and cut the existing floor so all pieces ended evenly (a few pieces previously extended a few inches more than the rest). It was not easy to get this straight, but I did what I could using a chalk line.

Before installing, to back up a bit, I brought the wood into the kitchen for a few days to allow it to assume room temperature and room humidity. I separated the boards into piles based on size. This helped break up the different bundles I bought, and allow for easy board selection during installation. I also picked out boards that were less than perfect. I used most of these against the west wall, where they will be covered with cabinets.

I began at the west wall by using a chalk line to measure out a line about 1/2" from the wall (this is the expansion gap) I laid out 3 rows of flooring, cutting the ends of the last pieces to make them fit, leaving about 1/2" for expansion along the south wall (this gap will be covered by baseboards). These rows had to be face-nailed by hand (nailed through the top through pre-drilled holes). I had to work around the water pipes for the sink here by making notches in the side of a short piece of wood at both ends.

I started out trying to do the job with a manual floor nailer that I rented, but I found that the nails wouldn't quite go all the way in. I had to set them by hand, which was slow and occasionally led to bent nails. The nails were more or less unremoveable once placed, unless you take up the board and pound them out from underneath. When necessary, I would generally twist and bend a partially-driven nail to break it off if it had more than 1/2" sticking out.

I then rented a pneumatic nailer, which uses an air compressor to assist the mallet in driving the nail. This one gave me the same problem. I switched to a larger air compressor, thinking that might solve the problem, but it didn't. I thought maybe my floor was too hard, but another return to the rental place to try a different pneumatic nailer proved successful. It wasn't me, after all, it was the tools. With that taken care of, I could proceed. By this time, I had laid out about half the floor, so I just had to go back and nail the rows that were ready to go. I made marks on the east and west walls where the floor joists were, and tried to nail into them when possible, while still maintaining 8-10" nail spacing.


Another obstacle to work around was the vent. We decided to put in a wooden vent that lies flush with the floor, so I had to make it fit by cutting some small pieces (the gap you see below was filled in later).


When I got within about 5 rows of the end, I was no longer able to use the nailer, because there was no room to swing the hammer. I tongue nailed a few rows by hand, but had to face-nail the last two. I had several long boards left at this point (40-50 inches), and I realized this portion of the project would have been easier with shorter boards. Tongue-nailing serves to help push a board flush against the previous row, something that is important with longer boards, because they can be harder to get a close fit with. A large board will overlap several shorter boards, and if these pieces are slightly misaligned, it will affect the fit of the long boards. Tongue-nailing with the nailer usually overcomes this difficulty, but face-nailing does not. So use up your long boards before you get to the end.

My last row ended about 1/2" from the east wall. This was perfect - close enough to be covered by the baseboard, without requiring me to rip (cut longitudinally) the last row. To finish, I had to do the area under the door, ending with stair nosing where the floor steps down into the entry way. I had to file away at the bottom of the door jamb in order to fit pieces under it. To get the stair nosing tight against the next row, I had to file away at the lip underneath so the piece extended further in from the edge (thus slightly reducing the overhang. Here is the installed product:


One more note: when you put your drill down after pre-drilling holes for face-nailing, lay it down instead of standing it up. If you do the latter, and you knock the drill over, it will fall forward and break the bit. I found this out twice.

10.31.2011

More on floors

While Craig is busy working on our floors (I think he is finding the task a bit more time consuming that originally expected, I think he has bad floor mojo or something), I thought I would talk a bit more about our choice. Mostly because it ends with me winning and that is always nice :-)

When we started planning the kitchen, we were going to replace the wall with a penisula. This meant the kitchen floor and the dining room floors could be different without being a visual nightmare and our floor options were wide open. Looking at my idea files and listening to my heart, I knew that wood was what I really wanted but I had heard some negative things about wood floors in kitchens so I attempted to listen to Craig's reasonings about other options.

We both liked slate. When my brother got married last fall, the house we all stayed in has slate kitchen floors and we liked the look but it seemed a bit too modern for the rest of the house. Plus, the sealing sounded like a pain.

I didn't really want tile. I love how easy to clean it us but I'm really clumsy and if you drop stuff on tile, it breaks. And my feet get cold easily. Yes, that really was one of the reasons I didn't want tile :-)

Cork. This is a pretty controversial in the world of kitchen floors. Some people think this is the bees knees because its soft, quiet and water and bacteria resistant, and other people think is will soon be outdated and is just not durable enough for a kitchen floor. I originally looked into it because it sounded cool but most of the pros/cons are similar to hard wood so why would I want to get something similar but not matching. The answer, I wouldn't.

Linoleum (the real stuff, not to be confused with vinyl - yuck) I think this was Craig's favorite for a while and I really wanted to agree with him. It's made from natural materials so its eco-friendly and fairly low in toxicity/offgassing compared to a lot of other flooring options. It does need to be polished occasionally to keep its protective coating but it seemed like it would be a good fit. I was trying really hard to sell this idea to myself, thinking it would be cool if we could keep the black and white checkered floor look which I am fond of as long as it is not off-white and black with missing patches like the old one was.

But right when I had almost convinced myself that I would settle for linoleum, we changed the floor plan from this


to this which means the old floor would meet the new one right in the middle of the fridge. That would be weird and really mess up the casual eat in kitchen look. Which is sad for poor rejected linoleum, but happy for me and my beloved wood floor option.

And I'm not really worried about the wood in the kitchen naysayers. Yes, I'll have to be careful about quickly cleaning up spills but the very reasons people don't like wood in the kitchen is the reason I do. It's quiet and soft on your feet. It's easy to clean and easy to know that it is clean (I have to sweep our living room at least once a day to keep it clean but unlike carpet, I know that it is clean once I'm finished!)

 And we'll be using a polyurethane coat so I'm not to worried about scratches or dents. Lucy is rough on our living room floor with her love of pushing furniture around but so far, nothing. And we don't wear shoes in the house so even if I suddenly develop a love of high heels (don't hold your breath), I think it will be just fine.

Of course, if we have a water pipe burst or a dishwasher leak sometime next year, I'm giving you permission to hold this conversation over my head. Just be gentle okay?